Growth Pouch Protocol for Studying Nodulation

In short - nodulation allows plants via rhizobia to convert atmospheric nitrogen into a usable form, promoting soil fertility and plant nutrition, and reducing the need for synthetic fertilizers. it thus, contributes to sustainable agriculture by optimizing nitrogen fixation and reducing environmental impact. We need to better understand nodulation, in particular by identifying genes and mechanisms for improving nodulation efficiency, and identifying genotypes with superior N fixation.
In summary, the study of nodulation benefits agriculture, the environment, biodiversity, biotechnology, and climate change mitigation. Nodulation can be studied in the field, by using root windows or soil corers, or in soil-based monitoring systems such as rhizoboxes. However, for high-throughput applications, germination paper-based root phenotyping systems have been proven to provide reliable results on nodulation. Below is a revised protocol to assist in the study of nodulation in root phenoboxes, growth pouches and germination paper-based assays.
Protocol for Nodulation Assays in Growth Pouch Phenotyping Platforms
- Prepare your germination paper-based phenotyping systems for sterilization by placing the germination paper between wet paper towels and wrapping tightly in aluminium foil. You may be using pre-sterilized bags from commercial suppliers. If not, it is important to keep the germination paper moist during autoclaving to prevent it from becoming brittle. PMMA surface of pouch phenotyping systems can be sterilized with EtOH and/or UV; do not autoclave acrylic glass (PMMA). If using Type 1 growth pouches (in plastic sleeves) use new sleeves for each experiment or pre-sterilized germination pouches; may be rinsed with EtOH but are usually rather sterile. If using Root Phenoboxes, wrap the EPDM sponge in new cling film.
- Sterilize seeds and germinate on wet paper or water agar for 2–3 days. A laminar flow cabinet provides an optimal, sterile and particle free working environment for seed and paper pouch preparations. Place 3–5 seedlings per pouch - depending on pouch size, expected root system size at time of harvest, and intended thinning at early stages. Place the seeds either in the trough formed by the germination paper in the bag (which has holes in it) or on moistened growing paper. In type 2 growth pouches the rigid front panel can prevent larger seeds from moving / falling when placed upright. If pre-germinated, select seedlings with straight roots whenever possible, as they are easier to insert and tend to grow better; placing seedlings allows for better plant selection and reduces the possibility of fungi or other contaminants already being present on the seeds. Alternatively, seeds can be placed directly in the germination paper, but this reduces the chance of selecting the best seedlings. When using seeds, it is recommended to put 2-5 seeds per bag, keeping in mind that at least some of them may not germinate properly.
- Add 8-10 ml of sterile water or ½ strength plant nutrient solution (containing nitrogen) to each bag. Wrap the bags in aluminium foil or use dedicated Shading Panels or PhenoRacks to maintain darkness and place them in a growth chamber for 3 days in the dark (if seeds were used in step 2) or directly in the light if seedlings were used. For larger scale experiments, you can use PhenoRacks for placing multiple growing pouches on the hanging rail system. There are two options for watering, either use germination bags that are re-wetted from a bottom reservoir (on the PhenoRack), or water from the top. If watering from the top (when using closed plastic / office envelopes), consider using sterile (glass) straws to enter the water to the bottom of the sleeve - this will allow the plants to be watered from the bottom without removing the germination paper from the sleeve. Watering from the bottom up is helpful in delaying contamination from watering from reaching the root systems.
- If seeds were used, remove any seedlings that did not germinate properly or show signs of fungal decay. In addition, if a root is not growing toward the inside of the bag, adjust the root - make sure the roots are pointing toward the bottom of the bag. Inoculate the approx. 3-day-old seedlings with rhizobia at an optical density (OD600) of approximately 0.05-0.1 by either spraying or pipetting. Take care to apply the inoculant to the roots as much as possible. If seedlings are used, inoculation can be done at the time of sowing, otherwise it should be done after germination of the seeds.
- Cover the pouch (downward from the seed) to ensure the roots are covered and kept in the dark. Place the pouches in a PhenoRack or similar pouch-racks with Light Protection Panels - or use aluminium foil or black plastic sleeves.
- Monitor the moisture level in the germination pouches regularly, making sure the paper remains moist but not overly wet. Watering can be done with either distilled water (dH2O) or ½ strength plant nutrient solution (Hoagland, Fahraeus, etc.). Alternating between water and nutrient solutions may help prevent salt build-up in longer experiments. Pay attention to pH levels as they tend to drop on germination paper. Using a well-buffered nutrient solution for watering can help stabilize the pH. Check the pouches daily and refill the medium approximately every other day or more often as the plants grow. Water requirements will vary with plant size and growing conditions such as chamber humidity, light intensity and temperature.
Revised text based on: https://staceylab.missouri.edu/protocol-nodulation-assay-pouches/
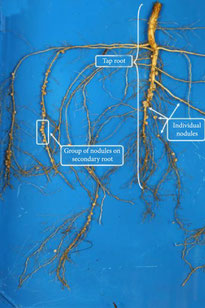
What is a Nodule?

A nodule, specifically in the context of legumes, is a small, rounded structure that forms on the roots of the plant as a result of a symbiotic relationship with nitrogen-fixing bacteria called rhizobia. When cut open, a nodule typically reveals a pink or reddish interior. This colouration is due to the presence of leghemoglobin, a protein that helps create an oxygen-rich environment necessary for the bacteria to perform nitrogen fixation. Inside the nodule are numerous small spherical structures called bacteroids, which are actually the rhizobia bacteria living inside the plant cells. The bacteroids and plant cells work together in a mutually beneficial way. The plant provides energy and nutrients to the bacteroids, while the bacteroids convert atmospheric nitrogen into a form that the plant can use for growth and development. Please note that the appearance of a nodule may vary depending on the specific plant species and stage. Use UHD root imagers to follow nodule development in situ!
Related Products
The Q-NF1LP Nitrogen Fixation Package is measuring the H2 evolution to non-destructively determine the N fixation by rhizobia.


