Frequently asked Questions
Got a question? We are here to answer! If you don't see an answer to frequently asked questions (FAQs) here, drop us a line on WhatsApp or via Email, or give us a call (see Contact tab for details).
Please refer to our General Terms and Conditions of Sale and Delivery (GTS) for specifics and as legally binding document of all business relations between Vienna Scientific Instruments GmbH and any natural or legal persons (Buyers/Customers). Special regulations apply to the webstore customers as indicated. Please read and agree to our Privacy Policy before submitting any personal data to VSI.
How long does it take to receive a quote?
- Quotes are usually sent within 2-3 business days after the request is received. Please call or send a chat message (WhatsApp) in urgent matters (meeting grant proposal deadlines etc.) to fast-track your quotation.
Where do you ship?
- We provide services to customers world-wide.
Does my quote always include shipping?
- No. All Product prices exclude costs of shipping and handling and insurance, in accordance with delivery terms designated by VSI. Shipping terms on quotes will default to Ex-works. This term means by definition that the Buyer is responsible for arranging shipping from our facility in Alland, Austria. Alternatively, Buyers may indicate to receive the goods via our distributors. Thus, quotes do not include shipping charges unless requested (e.g. on the request pricing form). Unless otherwise agreed in writing, costs will be paid by the Buyer and will appear as a separate item on the VSI invoice. VSI shall ship in accordance with standard practices. Buyer may specify different shipping instructions, subject to agreement by VSI. Unless otherwise agreed to in writing by VSI, all products shall be packaged, if appropriate, for shipment and storage in accordance with standard commercial practices. All packing shall conform to carrier requirements.
Are customs duties, taxes, and other fees included in my quote?
- No. All customers are responsible for calculating and paying customs duty, taxes, and any additional fees required. Customers inside the EU single market are advised to provide the VAT number of their institution/company when ordering - otherwise the Austrian tax rate has to be charged. Please consult an importation specialist to determine taxes and fees if you are located outside the EU single market. Customers may request our distributors to handle import, if applicable.
How long will my order take to ship?
- Since most products are made to order, shipping/delivery dates depend on the complexity of the product, the sourcing of raw materials, and current workload. A realistic delivery date will be calculated when the buyer requests a quote. However, shipping/delivery dates are approximate and may be delayed unless all necessary information and (pre)payment is received promptly from the Buyer. VSI shall not be responsible for any failure to perform or delay in performance due, in whole or in part, to any cause beyond its reasonable control, including, but not limited to, acts of God, governmental action, war, civil commotion, riot, sabotage, labor shortage or dispute, failure or delay in delivery by VSI's suppliers or subcontractors, transportation difficulties, customs clearance, shortage of power, raw materials or equipment, or Buyer's fault or negligence. In the event of any such delay, the delivery date shall be extended for a period equal to the time lost as a result of the delay.
Why do I need to fill in a configuration form for "simple items" such as a rhizobox / growth pouch?
- As we want customers to receive exactly the rhizobox / RhizonBox or Growth Pouch designs they need, we implemented the use of configuration forms in 2019 to avoid any misunderstandings - there are literally infinite configuration options! Please ensure that we receive your latest changes of the required design well before we start production!
RhizoBOx assembly
My rhizoboxes just arrived. What should I do?
BEFORE SIGNING for the package with the delivery service, please check that all parts are intact. This requires opening the package(s) and checking for any damage. Please register potentialy damages immediately with the delivery service person - as to claim damages retroactively is very difficult to impossible. Document any damage with a photo and contact us immediately. Again, please do not sign on damaged rhizoboxes!
Everything OK? So how do you assemble the rhizoboxes / splitboxes?
Find a clean table to avoid scratching the boxes during assembly. Unpack all items. Check in particular for the (small) package with screws and spacers - do not throw them away by mistake. In a simple process, please follow these building steps for assembly; the illustrating images are for splitboxes, but similar applies to all types of rootboxes:

Get a torx screwdriver / torx bit from your toolbox (size 10 or 20). We use Torx because they do not wear out. We use T10 screws for smaller root boxes and T20 (image) screws for larger root boxes. Consider using an electric screwdriver with bit if you plan to assemble many boxes, BUT work slowly in the lowest gear!

First please familiarize yourself with the individual parts. A Rhizobox / Rhizonbox usually consists of 1x front panel (transparent), 1x back panel (usually black), 2x side panels, 1x bottom (often perforated and the shortest part; all usually black), 1x spacer (metal) and 2x screws (metal) for each hole in the front panel. Splitboxes also include a center divider that is slightly shorter than the sides (see image). At the time of shipment, acrylic parts have a protective film (on both sides) to prevent scratches during manufacturing and shipping. Prepare all elements on a clean surface / table to prevent scratches during the assembly process.
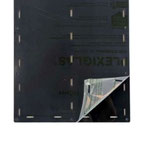
Remove the protective film from both sides of the back panel.
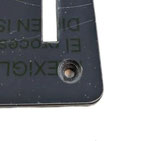
Identify the side of the panel with the countersunk hole / recess (see figure). This countersunk side always faces the outside (i.e. front / back) of the Rootbox and is the side where the screws go in. The spacer will always be installed on the other = flat side of the front and back panel holes.

Assemble the spacers to the panel by inserting the screws from the side with the countersunk hole/small recess around the hole (which prevents the screws from protruding), and the spacer from the inside where the holes are in "flat" acrylic. The easiest way to install the spacer is to place the panel on one side, insert the screw, press down on the screw with the finger of one hand (to prevent it from turning), and then install the spacer by turning it clockwise with the other hand (see illustration). Use a screwdriver if necessary. Do this for all the drilled holes in your box, possibly turning the panel in the process. In the end, you will usually have 4 screws/spacers installed for smaller, A5 rhizoboxes, and 9 or more screws/spacers installed for larger boxes.
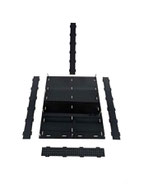
Next, place the assembled (back) panel on the table with the metal spacers facing up and the screw heads facing down. Identify the side panels, bottom panel, and possibly the center divider (see figure). Remove the protective film from both sides of two side panels and one bottom (and the center divider if you have a split box design). Sides and center (if splitbox) usually have different connector patterns so they cannot be installed in the wrong place; centers are also allways slightly shorter than sides. Bottom panels usually have drainage holes and are much shorter allowing for easy identification.
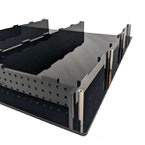
The side and bottom panels are symmetric, thus their orientation does usually not matter, just give it a try. Place the pegs of the bottom and side panels ("connector system") into the cutouts in the rearpanel. If you have a center divider / or several center dividers (in splitboxes with more than two compartments), place them last. You could fill the open Rhizobox with soil now (or decide to fill with soil from the top later). When you are finished, check that there is no soil on the top of the side, center or bottom panels (which will prevent closing). The filling process is facilitated by placing the box slightly angled (top upwards), e.g. using a Rhizobox manipulation stand - preventing soil falling out from the (open) top.
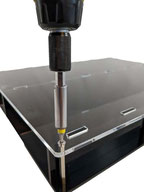
Finally, remove the protective film from the (transparent) front panel (both sides!!). Place the cutouts in the front panel on the pegs in the side and bottom panels (and center divider, if applicable). Make sure that the flat side of the drilled hole is facing inward (the countersunk hole is facing outward / upward - toward you). You may need to move the sides and center pieces a bit to get all the pegs to snap into the cutouts. Insert the screws from the top into the spacers (through the panel; see image) and tighten lightly. You can both use a screw driver with Torx bit, or CAREFULLY an electric drill. DO NOT OVERTIGHTEN the screws as this will break the acryclic and has no advantage!
Pro tip: Before closing the front panel, consider taping the inside and top of the plant compartment to prevent light from entering (if you already know the height of the soil-free compartment above).
If you did not fill in the soil before, you can now fill in the drainage layer / soil from the top. You may want to water the boxes several times from the top to allow the substrate to settle. Place the seeds/plants. Possibly install the light shielding panel and tape (not included) on the side of the plant compartment and on top of the front panel for maximum light exclusion. Place the rhizoboxes at an angle (e.g. in rhizobox racks) with the transparent front panel facing downwards and protect the roots from light. Success!
Can I talk to an application specialist or a scientist about my research and about VSI instruments?
- At VSI we care about our customers and want them to succeed in their research. Please get in contact and we will connect you to one of our application specialists or one of the researchers / scientific advisors depending on your needs.
Do you provide training and support for your instruments?
- Yes, once your instrument is delivered, each product's designer/engineer is available to answer questions and provide additional technical support as needed. It is also possible to book our application specialists for courses - covering initial start-up, operation and maintenance topics.
Do you offer calibration, maintenance and repair services for your instruments?
- To ensure a continued, long-term functionality of your device, we are offering calibration & maintenance services and recommend that you check your equipment regularly. You may return your equipment for repair during and after the warranty period; costs may be incurred after the warranty period has expired or if the equipment has been mistreated or used improperly. We offer repair service for at least 10 years after purchase and/or as long as spare parts are available on the market.
How long is the warranty period?
- VSI warrants that, for a period of twelve (12) months from the date of shipment of the Products from VSI. VSI SPECIFICALLY DISCLAIMS ANY INDIRECT, SPECIAL, INCIDENTAL OR CONSEQUENTIAL DAMAGES (INCLUDING LOSS OF USE OR LOST PROFITS) WHICH MAY RESULT FROM THE USE OF PRODUCTS PURCHASED HEREUNDER, AS FURTHER SET FORTH IN THE CONDITIONS OF SALE. This limited warranty extends only to Buyer as original purchaser unless otherwise agreed upon in writing by VSI.
- The foregoing warranty shall not apply if the defective Product (i) has been subjected to abuse, misuse, neglect, negligence, accident, improper testing, improper installation, improper
storage, improper handling or use contrary to any instructions issued by VSI, (ii) has been repaired or altered by persons other than VSI, (iii) has not been installed, operated,
repaired and maintained in accordance with the documentation or operated outside of the environmental specifications for the Product; (iv) has failed due an Act of God, including but not limited
to fire, flood, tornado, earthquake, hurricane or lightning or (v) has been used with any devices, accessories or products not manufactured by or approved by VSI. In addition, the foregoing
warranty shall not apply to Products (i) marked or identified as “sample,” (ii) loaned or provided to Buyer at no cost, or (iii) which are sold “as is”. The warranty does not apply
to:
- (a) Consumable parts, such as batteries or protective coatings designed to deteriorate over time unless failure is due to a defect in materials or workmanship. As with all batteries, the maximum capacity of the capacity will decrease with time and use; this is not a defect. Only defective and leaking batteries are covered by this covered by this warranty.
- (b) Cosmetic damage, including but not limited to scratches, dents, cracks, or other cosmetic damage..
- If during the Warranty Period: (i) VSI is notified promptly in writing upon discovery of any defect in the Product, including a detailed description of such alleged defect, (ii) such Product is returned, transportation charges prepaid, to VSI designated manufacturing facility subject to the prior approval of VSI, and (iii) VSI inspections and tests determine that the Product is indeed defective and the Product has not been subjected to any of the conditions set forth above, then, as Buyer’s sole remedy and VSI's sole obligation under the foregoing warranty, VSI will, at VSI option, repair or replace without charge the defective Product. In no event will the Buyer itself nor will the Buyer allow any party other than VSI or a third party authorized in writing by VSI to perform any service on the Products.
- We offer several options to extend the warranty period.
How can I return an item to VSI?
- Custom-made items can only be returned if they do not fulfill the specifications agreed on in writing, in case of any warranty claim or for repair and calibration purposes. Costs may occur. Please see the "Returns" sections for specific return instructions.
How about the payment conditions?
- Services and Products with a value ≤3.000€ (without VAT) must be paid with completion of the performance/ signing the delivery notes within 14 days from invoice date.
- Services and Products with a value over 3.000€ (without VAT): 50% of the remuneration shall be due on conclusion of the contract for the start of performance (project instalment) within 7 days, and 50% following completion of performance with the date of signing the delivery notes and/or the written information to the customer, regarding project/production finishing, within 14 days.
- Payments have to be made to our Austrian bank account (as given on the invoice) in EURO. Payments by credit card and cheques are currently not possible; please ask for payments via PayPal if relevant. Payment processing and currency conversion fees (for payments made in other currencies) are sole duties of Buyers.
Why am I not receiving emails from Vienna Scientific Instruments?
- We strongly recommend that you regularly check your spam folder for VSI notifications. Update your 'Safe Senders' list to ensure that emails from Vienna Scientific (i.e. office@vienna-scientific.com or other addresses ending in *@vienna-scientific.com) are not filtered into your spam folder.
