
Acrylic Trays for Root Scanning
Whole Scanner Area Trays

Root Scanning Trays. The use of a root scan tray that fits the entire root imager / scanner area has advantages over the use of, for example, Petri dishes: i) Higher throughput: A full-field tray can accommodate more roots, resulting in higher throughput & faster image acquisition. Greatly increase the root washing efficiency by using a semi-automatic root washing device. ii) Fewer images, fewer artefacts: A root-scan tray ensures that all samples are imaged under the same conditions and no casting marks (as the centres of Petri dishes) are on the image - resulting in fewer images, fewer artefacts and more accurate and reliable data. iii) Visualisation of whole root systems / larger root branches: Large, water-filled scan trays allow better visualisation of the root system architecture, as the roots are not confined to a small (circular) Petri dish and can be spread more widely. Fit the roots of one soil sample, or one or several smaller plant root systems, on one tray. iv) Less dense roots are a prerequisite for as little as possible overlap of root samples, resulting in more accurate root morphological data. Overall, using a root scanning tray that fits the entire root scanner area is a more efficient method of root scanning than using Petri dishes. Pro tip: Use plastic tweezers to avoid scratching the acrylic scan tray.
Root Scan Trays - Features
- 3 sizes: A4 ("letter"), A3 and custom
- 20 mm high to minimise water spillage
- Maximized scan area use
- No casting marks, highly transparent PMMA - facilitates segmentation
- Waterproof - protects your scanner
| Specifications | Root Scanning Trays | OPEN |


Buy A4 and A3 Root Scanning Trays - Online Shop

Root Scanner Kits & Rotational Root Imaging

Matching 2D-root imagers / flatbed scanners, fitting the acrylic root scanning trays, and kits (scanner, trays and spacers) available.

For RGB-imaging of root-crowns and rotational imaging of whole 3D root systems, consider the LK-1200 Benchtop Root Analyser.
Preparing Plant Roots for Scanning
- Thoroughly rinse your roots, especially removing adhering mineral soil, organic particles, and rhizosheaths. Store washed roots in water-filled beakers or similar containers in the refrigerator (a few days to 1–2 weeks is usually fine, species dependent; longer storage may result in loss of root tips and subsequent decay). Continue reading
-
Before taking root images, it is possible to stain the roots. The purpose of staining is to increase image contrast, thereby improving measurement accuracy and making it easier to determine root diameter. Staining may be particularly necessary for very white, fine roots (less than ~0.1-0.2 mm in diameter). However, it should be noted that staining is an additional step in the process that requires more time and careful sample handling. The use of staining can be challenging, especially with small plants where the entire root system is scanned, as it can interfere with subsequent chemical analysis of the tissue. To determine the need for staining, it is recommended that a preliminary test be performed by scanning a sample both before and after applying the staining method. The recommended stain for root staining is Neutral Red, which is prepared at a concentration of approx. 0.16-0.20 g L-1 in water.
As an alternative to staining, consider increasing the scan resolution from the standard 300 to 400 dpi to 600 or 1200 dpi - at the cost of much longer scan times. Higher resolutions are desirable, but often not feasible for many samples without running scanners in parallel. The ideal scanning resolution, however, varies depending on the sample type. For most trees and Phaseolus vulgaris roots, for example, a resolution of 300-400 dpi is sufficient. Conversely, Arabidopsis, grasses and Salix sp. roots should rather be scanned at 600 dpi+. Opting for lower resolutions can significantly speed up the scanning process, particularly when dealing with samples that require large trays. To ensure accuracy in measurements, we recommend scanning a sample at different resolutions to determine if reducing the image resolution compromises precision / recognition. For larger and non-flatbed compatible '3D' root systems, camera-based imaging system, such as the Benchtop Root Analyser, might thus be a time-efficient alternative. When conducting root length analyses, greyscale images are often employed (tif or jpg formats), as saving images in greyscale format significantly reduces the file size.
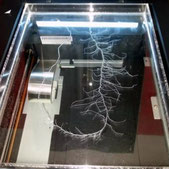
During the scanning process, using a scanner with transparency unit, the roots are placed in acrylic root scanning trays filled with ~ 10-15 mm of water. This allows for better arrangement of roots to minimize overlap and crossing. Be particular careful not to align roots parallel to each other, as this may make them not distinguishable for image analysis programs - resulting in faulty results for (larger) root diameter, underestimated area and root length etc. Make sure that some of the root side branches, tips are not "sticking out" of the water - roots should be spread out in 2D as much as possible. Consider taking heavily branched, and "3D" (i.e. not flat) root branches apart for recognition of individual root tip, individual segments in heavily branched root regions etc. Test the image analysing procedure after a few scans to make sure all root segments are recognized individually by software as required. Stay away from the sides of the root scanning tray to facilitate selection of the regions (of interest) to be analysed. Plastic forceps and extremely fine plastic pipettes may be used as tools for this delicate procedure. (Pointed) metal forceps are not recommended as they easily scratch the acrylic root scanning trays.
For batch image analysis, consider placing the root scanning trays and the roots in them always at the same position on the scanner. Mark this position on the scanner glass (e.g. with tape) when using trays not covering the whole scanner area.
Adequate lighting (already during placement; e.g., using an additional office lamp) and steady hands are beneficial for optimal results.
After scanning, be sure to collect all the imaged roots for drying (when calculating root morphological parameters). A small sieve may be helpful to quickly collect the smallest root segments. Pour the water from the tray with roots into the sieve.
Success!

The Semi-Automated Root Washer will greatly facilitate root preparation for root scanning as a routine laboratory task.